
Well, I’ve been trying to think of a cute Valentine to make for Raya to give to her friends at school, and I think I finally hit on a simple and practical enough idea. Last night, I made the first of five love birds for her to share!

I forgot how much I love making stuffies! This little guy has no eyes to fall off, and an interesting ribbon tail. Hopefully he will be a hit with the kiddos in Raya’s class. Yes, they are one. And younger. I just hate calling it day care. :) But that means that edibles are out, and things that will end up being edible that shouldn’t be (like traditional Valentine cards) aren’t a good idea either. I really wanted to do some embroidered felt valentines, but while they might turn out pretty, they won’t be appreciated by anyone that young. But this guy can actually be played with (to a certain extent – he doesn’t have much for bells and whistles) and he is love-themed. :)
I will do my best to share how I made him. Anyone who sews three-dimensional things will find it to be extremely easy. If you haven’t before, I’ll try to point out the common beginner pitfalls, because this is actually a really nice project to start with because it’s only three pieces of fabric. And as always, just email me if you want to talk over any confusing points!
Time: 45 minutes to an hour, if you’ve sewed stuffies before. If it’s your first try, set aside about 90 minutes. You may not need them all, but believe it or not, I know what it’s like to be a novice!! My first stuffed animal was less than a year ago!
Supplies:
- Fabric Scraps
- Coordinating ribbon – even short lengths will work
- Polyfil. You can use any poly or cotton stuffing, but of everything I’ve tried, I REALLY like Polyfil the best! So if you have to buy supplies – trust me, it’s worth it. Otherwise, use what you have. :)
First of all, let me share my low-tech pattern:

I didn’t add a scale to it, I just put my pieces on my scanner to show you what I used, but the bird body is around 8″ from beak to tail the way I sketched him. You can probably even just scan and print this picture if you want! But decide how you want your body shape to be. The width of the belly piece will determine how big around your bird will end up.
Once you have settled on your design, trace and cut your pieces. Make sure when you do your body pieces that the right sides of the fabric face each other if you cut them both at the same time – you’ll need one with the beak facing the right, and one to the left:

Then pin the belly to the right side of the fabric on the bird body. I marked on the pattern where I pinned mine, but you can make your bird more upright by moving the body piece closer to the tail, or have its head point more downward by moving it closer to the head. I just centered mine, more or less.
If you want to give your bird eyes, it’s easiest to do it now before you join all your pieces. I opted for no eyes. Less choking hazard that way for small kiddos.

Once it’s pinned, stitch it. I used about a 1/4″ seam allowance, which isn’t much. I make up for my narrow seams by reinforcing it with a second (and sometimes third) row of stitching to ensure it can’t pop a seam.

Now, pin the other side of the belly to the other body piece, making sure your head and tail are going to line up evenly.
And stitch that side of the belly too. See? It’s coming right along, this is a pretty simple design.
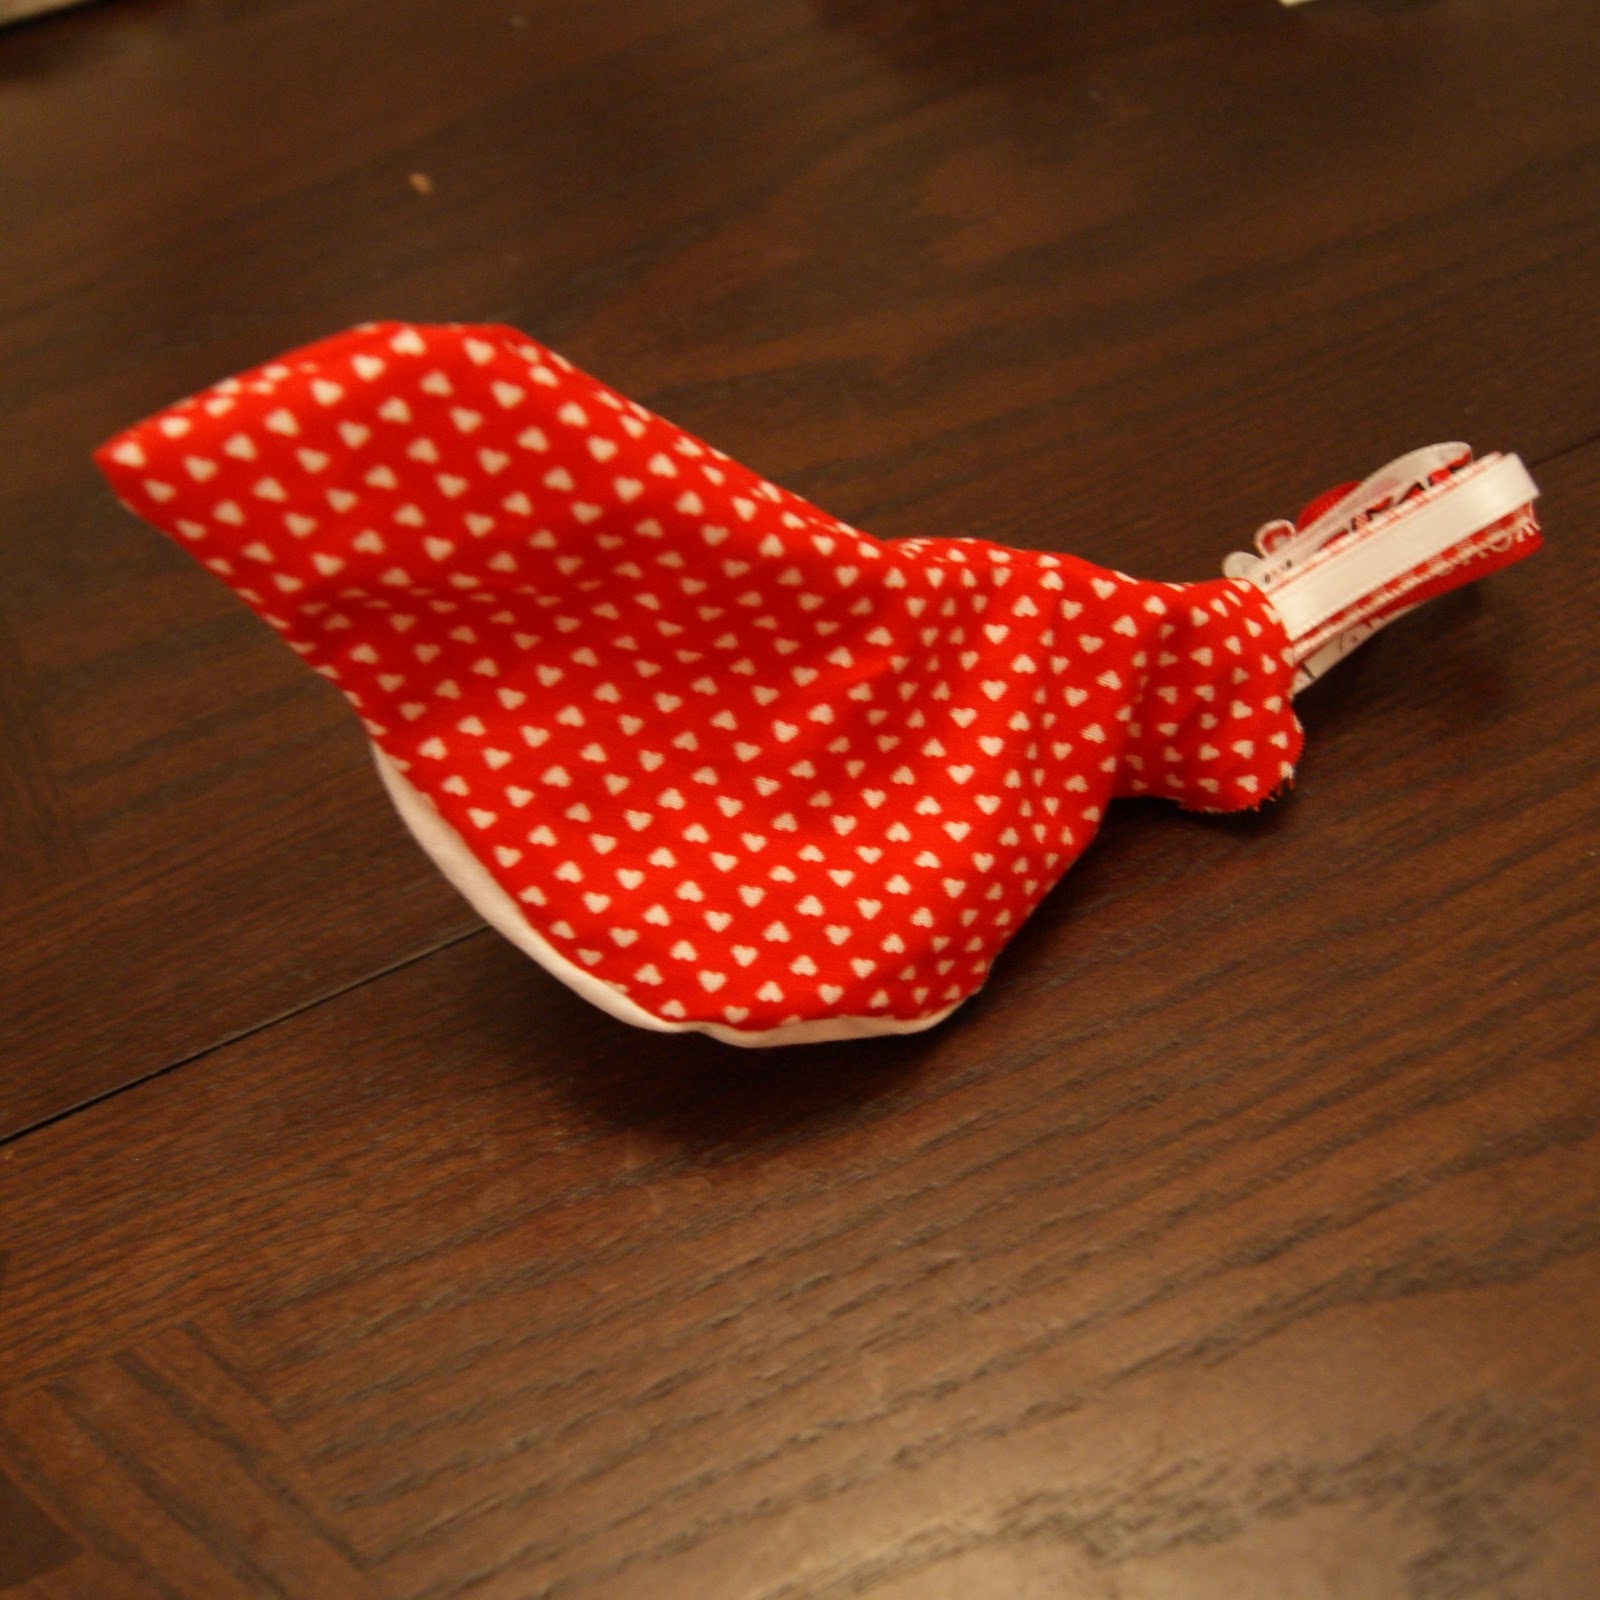
Now make your tail. I used some short lengths of coordinating valentine-ish ribbon and bent them in half, arranging them from biggest in the center to smallest along the sides – but do it however you like!

Now, I almost missed this when I was piecing – I was getting ahead of myself with my prototype! But now is an excellent time to insert your tail so that the loops are facing inside the body, and the stumps are hanging over the line of your bird body. That sounds complicated, but have a look (and don’t mind that the body is already partially stitched here, it’s easier if it’s not. I just nearly forgot!)

We have to make it inside-out – we’ll be turning it right-side out in a few minutes. That’s why the tail faces in right now.
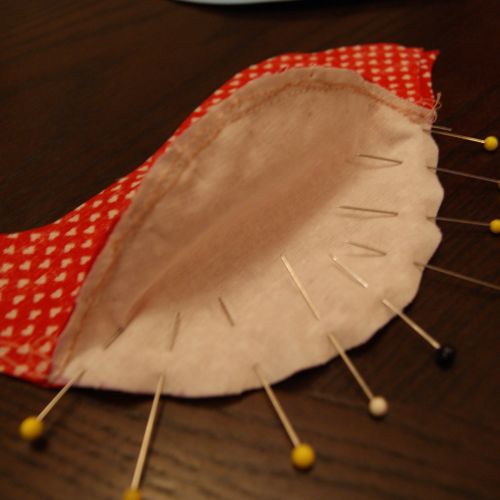
Now, stitch all along the body leaving a hole between the belly piece and the edge of your tail piece. It’s easy to get going and forget to leave a hole, that is why that reminder is in bold, LOL. :) But that’s how we’ll turn our bird right side out, so it’s important! It’s marked on the pattern with a dashed line where we will be leaving our hole. You’ll also want to pay special attention that you don’t stitch your sides together, you need to go around the belly piece, so make sure the belly piece isn’t folded in half on the underside – it needs to be open.
And because I am paranoid we play it safe when we make toys for kiddos, I run another line of stitching around all my seams, except for where we are leaving our hole. Popped seams will need attention, obviously, and it’s far easier to fix it now while it’s still inside out and we can use our machine. Pay special attention to the corners of the belly – those are the biggest culprits.
OK. Now that he’s mega-stitched, trim any excess fabric or ribbon stumps. Find the hole:
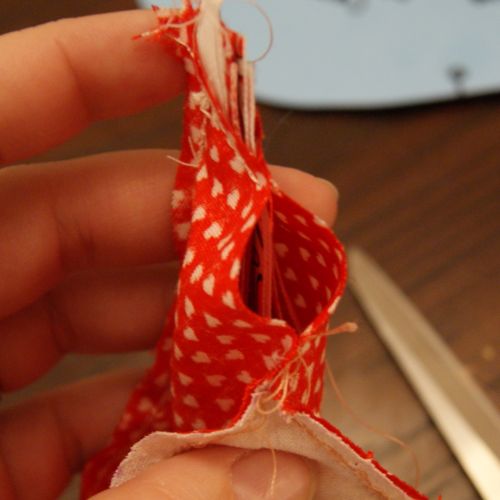
Reach in there, grab something (I found the tail to be easiest), and ease it out of the hole. Remember you’re doing this for the kids, so refrain from cracking dirty jokes. Once you get a little bit out, keep drawing the inside of the bird out through the hole. It can look all wrong, if you haven’t tried stuffies before:

Just keep going, until the whole thing is right-side out. I sometimes use a chopstick or a butterknife to help things along if I have inadvertently made my hole too small. Don’t use your scissors – it’s tempting, but you don’t want to risk poking a hole now that we’re nearly done.
Tadaa, deflated bird!
Now, add your polyfil. Stuff fairly firmly. Make sure your polyfil gets all the way to the tip of the beak. It’s easy to make the mistake of keeping it sort of soft, but you’ll get a cleaner shape if you keep stuffing.

Now, to fix the hole! Just stitch it up by hand.

And that’s it! He’s ready to spread some love!

Wow, my photos need help – but it’s too dark as I’m blogging for any natural light, sorry!! I’ll update with prettier photos once I get some. That’s what I get for waiting to craft until the last minute. :P I was just so excited to share something that FINALLY turned out the way I was hoping this week, I couldn’t wait!
See you tonight for Freestyle Friday!
I link up to these great parties!
~ Adrianne
I made 6 of these yesterday (a little smaller than yours) and made them into a mobile. Your instructions were spot on! Thanks so much for the idea and for the instructions. :)
Too cute! Great tutorial. One day, I'll have to break this back out. Going to pin this!
Bernadette @ http://www.b3hd.blogspot.com
Ooh I love this birdie! This is just perfect for my little 9 month old at valentines day. I'll definitely be making one. Thanks for the idea!
Love your little birdie. I pinned it so when I have time I can make one. I think i'll use mine as a pin cushion.
Thanks, your newest follower, Jules
So Sweet!
So cute! I'm pinning this! Thanks for the tutorial!
So cute! Total pinned it too and added it on to my “to do” list. Thanks!!
These are really cute! I'm adding them to my list of crafts to make. I love these for baby shower gifts too.
i'm pinning this. So easy and whimsical. Thanks for the inspiration! I'm having a link party on my blog right now if you want to share this idea. Here's the link if you're interested. http://caribbeanmissionarywife.blogspot.com/2012/01/t-time-54-and-link-party.html Have a lovely day, Maria
Too, too darling! Thank you for giving us such a detailed tutorial. I always have trouble getting my softies to look fully stuffed.
So cute! Another thing to add on to my “to make” list. Pinning it for sure!
nice work from a man who does not do this kind of stuff-God Bless from a new follower from Inspire Me Monday Blog Hop
Cute! I keep meaning to make a chicken version but never get around to it! Love the tail
So darling!
How cute!! There are so many uses for these! I'd love for you to link at Things I've Done Thursdays & for you to include me on your link party list! Thanks for sharing!!
http://www.bearrabbitbear.com/2012/01/things-ive-done-thursday-19-progresso.html
This is so cute! I love the looped ribbon for the tail!
Super cute! I love making little stuffed critters so I will have definitely be making this little bird!
These are so super cute! I think I may have to try to make these for a fun nursery project!
Thanks for linking up to this week's Catch a Glimpse party! I will be featuring this tomorrow! :)
Wow! These are adorable!
Hi, I'm visiting from Momnivore's Dilemma. These are so cute, I will be making some, soon. Thanks for sharing!
Oh, I think Raya's friends will LOVE these! They are really adorable. I especially like the ribbon loop tail. :-)
So Cute!!! I can think of a few kiddos that would love this! Thanks for the tutorial I haven't ever made stuffed animals just pillows. But this looks like something I could do. Thanks so much for linking up to our party this week.
These love birds are so cute! I made a set of bride and groom birds and they were so much fun! (You can see them on my blog under “Wedding Birds). Have you ever tried using Morning Glory Cluster Stuff for your polyfil? That stuff is amazing! It is little tiny soft “pellets” of fiberfill and it is so easy to use! It makes it easy to get everything nice and even! I love the stuff! ~ Barbara
Love this! Great gift for little kids. I'll have to tuck this idea away. :)
This is awesome and so super cute! When my daughter was little her favorite toy was simple like this. No eyes to choke on, no parts to lose, and lots of area to chew on! Now you have me thinking back to days I miss. Anyway this really does look great and oddly I could see a bunch of these on a Christmas tree too!
I love the reminder in BOLD not to stitch all the way around. That is precisely the kind of reminder I need. This is shockingly cute,…..I mean he doesn't even have eyes and he is completely adorable. Yay for a craft success.
so cute, I bet they will love them!