
Stones and Leather. When I become a rockstar someday, that’s what I’m going to name my band. And I am going to wear this:

I have seen these pop up in a few places this season, but what finally sparked my interest was that a coworker of mine was wearing one the other day. I admired it, and since I like making jewelry, I took note of how it was put together, and it looked really simple! I started thinking that instead of glass beads (like hers was made of) I’d like to go with a more earthy feel using some stone beads.
She confessed to paying $28 for hers. She felt that was a good deal.
Now if you’re here reading this, I’m going to assume that like me, you find paying $28 to be freaking crazy when you can do it yourself. Even if that’s not why you’re here, you’re about to find out that this is a really simple design. Hopefully you find yourself inspired to try it out – I’m going to show you how!
What you’ll need:

- 24 inches of leather cord for a single-wrap bracelet
- Round beads. Mine are 8mm leopard jasper, and I used one strand of beads (18 of them).
- Contrasting (or coordinating) thread and a beading needle
- Button or large bead for the closure. You could also opt for crimp ends, I just wanted a more organic look.
This bracelet took me an hour, but that was for two reasons: 1) I had to play with it a little to figure out how to make it, and 2) I had a little mishap with my thread. I was worried I would run out and I had no idea how much I would need… not this much, it turns out.

Doh. So I spent a considerable amount of time untangling that knot. I later discovered that the holes in these beads can handle a knot, so while you want to be cautious of getting too tangled, it’s not that big a deal to add more thread as long as you knot it very securely. I started with 10 feet, but you could just use 6 or 7 feet, because I had about 3 1/2 feet leftover. :) Double it up for security. Now, get your beads ready, because here we go.

First, tie a knot in the end. Make sure before you continue that your button will fit through the loop. I knotted my thread in too, but I decided afterward it probably wasn’t necessary. I’ll tie it on underneath next time.
Now, secure your end somewhere – you can tie it to a pillow and work on your lap, or I just taped mine to the table since that’s where I work. Weave your thread in to get started. Not only will this put your leather cord into place for a nice flat lie, but it will also make sure it doesn’t un-knot. You’ll want to wrap it around alternating sides, like a figure 8.

Now, snug it up nice and tight to your knot. Do a few rows like this.

Now, it doesn’t matter which side you do this from, but string a bead. Continue with the over-under weaving. You’ll see on the left the thread came over the left cord, and it’s going under the right cord.

When you bring your thread back over the right cord, thread it back through the bead. Go under the left cord. I realized I didn’t photograph this because I was making sure that would actually work (don’t worry, it does!) But you’ll continue the same over-under weave, only every time you cross to the opposite cord, you’ll be threading through your bead. Here’s a photo of threading back through the bead.

Got the hang of it? Then just keep doing it!

Because you’re going around both cords, you should find that your beads fit right in the middle. Keep your thread taut, and they will form a nice uniform line. Bead down around 7 inches. You may want to check it against your wrist, but that’s the length that I went with.

Once you get there, do some weaving like you did in the beginning. Same thing, like a figure eight, for a few rows. Then, knot it off.
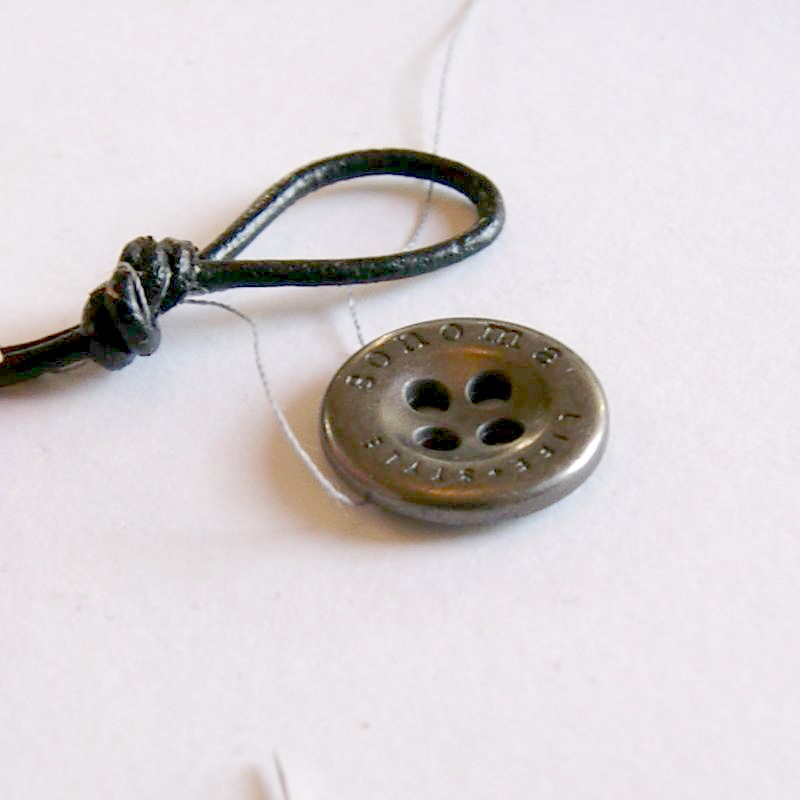
Now, just tie your button on!

Leather can be tough, so I really tightened it down… to the point where I actually broke one of the cords! I’m a bit nervous about it, so I added some glue to help secure my knot. Even if you don’t break yours, you may want to glue it to be safe anyway.

Then, I just let it dry. I think I’d really like to try a double-wrapped bracelet after this one, maybe with a smaller bead. I just love how it turned out!
I link up to these great parties!
~ Adrianne
I have been looking for a tutorial for this bracelet. Easy to follow and very detailed. Going to make mine know!! Thank you.
an AMAZING tutorial!’ I’ve made 2 so far, and I’m planning I sell them! one question, how do you but the leather and everything through the button? whenever I put the leather through the wholes, I always have to make a huge knot and then glue it so it will stay and it doesn’t look very cute. any tips on making it look good and clean?
Thank you for sharing this project! You did a beautiful job, with
the intricate stitching work. You’re the best! ***** :)
Do you use the thread to go through the button, attaching it to the knot that you tied at the end? Great tutorial! Best one I’ve found! Kuddos to you for looking at a bracelet and figuring out how to make it!
I’ve made quite a few of these.. find that the end where i put the button/finding on always twists.. GRRR… Maybe my leather to thick? Frustrating….
+I must tell this ,that while I'm making the bracelet im a little stiff and tense,mostly from concentrating so as to be as perfect as i can .about 1/3 through the project my back starts to have unbearable pains,but i persevere.and when i'm done ,i slip it on and all the pain magically goes away usually i go to utube cause i can't follow directions ,yours were crystal clear ,bless you.super good thank you.
Thank you for sharing your wisdom!! Love this!!! am definitely doing this!
You are so talented and creative! I am just looking at these bracelets you've made and saying, “wow!”
I think I may have to get back into jewelry making and try some of these.
Got it all done then got to the button part and got confused! lol, i used a big bead and didnt know how ti end the string! i just cut it and glued it hope it doesnt come undone!
Hey you super talented lady, I will be featuring this at our party tomorrow too! Thanks for partying with us. Hope you have had a wonderful week!
I will be trying this! Your directions look very clear. Thanks for sharing!
You are so creative! I just love this bracelet! Thanks for sharing at the Pomp Party! Pinning to our Pomp Party board!
Jill @ Create.Craft.Love.
I totally love your rock star band name…oh, yeah, and the bracelet, too :) So glad that you shared. Thanks for helping make Things I've Done Thursday a success!
Oh wow! I love your beautiful bracelet :)
Dee
I love these bracelets! Thanks for the tutorial, I'm making one for sure!
That is so pretty!!! I love the way it looks! You seriously make it look so easy! Thanks so much for sharing this as well at Thursday's Temptation.
Jill
I can't wait to try this! Thanks for the great tutorial!
Awesome tutorial! I'm a new follower and would love for you to follow me back at http://iheartpears.blogspot.com
You are awesome!! I LOVE this! One day when I can think I will have to give it a try. Until then pinning it will have to do.:)
The leopard jasper was a great choice. It's on my favorites to use in jewelry projects. And yes: $28!?! O.o
Wow! You are good! I don't think I could have looked at that bracelet and figured out how to make it! Thanks again for a great tutorial!
What a great tutorial..I've been drooling over these bracelets for a long time and now that I see this-it looks so simple…just a matter of finding beads you love :)
I freaking love this. I love the beads you chose – leopard even sounds rockerish eh. And great tutorial – I have no idea how you figured out how to do it but I am grateful. I'm definitely trying this.
Wow!! I love this bracelet. The beads you chose look like little earthy globes. Would look so awesome with a jean jacket and flowy maxi skirt, some flat strappy sandals. XO Courtney
http://www.baxtronlife.com